|
|
 |
|
|
|
Welcome to the Australian Ford Forums forum. You are currently viewing our boards as a guest which gives you limited access to view most discussions and inserts advertising. By joining our free community you will have access to post topics, communicate privately with other members, respond to polls, upload content and access many other special features without post based advertising banners. Registration is simple and absolutely free so please, join our community today! If you have any problems with the registration process or your account login, please contact us. Please Note: All new registrations go through a manual approval queue to keep spammers out. This is checked twice each day so there will be a delay before your registration is activated. |
|
|||||||
 |
|
|
Thread Tools | Display Modes |
|
|
#1 | ||
|
FF.Com.Au Hardcore
Join Date: Jun 2005
Posts: 588
|
I noticed a gurgling noise when going through turns today so I figured it was a blocked evap drain tube. (I have a fairmont so it has climate control with A/C always on). I pushed a cable tie into the tube about 15cm but nothing came out - no crap, no water. Then I noticed a drip coming from the OTHER side of the engine bay, just behind the power steering pump and underneath the exhaust heat shield.
Is this just a bad coincidence or has me poking into one place magically created a leak elsewhere??? I think it may be coolant as it looks like a pipe runs under there. :( I'm going to pull off the heat shield once the engine has cooled for a better look. In the meantime, any ideas? Is this a common prob? |
||
|
|

|
|
|
#2 | ||
|
FF.Com.Au Hardcore
Join Date: Aug 2007
Location: Brighton, Adelaide
Posts: 3,972
|
the heater pipe runs from behind the waterpump along the block under the ehaust manifold and around the back of the motor, to the heater core outlets on the firewall.
there are a couple of bolts holding it to the block/trans at the back they are common to go in the earlier e series. the new pipe costs about $50, and you will need a new oring for the back of the waterpump too if it doesn't come with the pipe. you will probably need new coolant too, as most of it will drain out when you take the pipe out. craig
__________________
Money Talks, but all i ever hear is it saying Goodbye!! |
||
|
|

|
|
|
#3 | ||
|
FF.Com.Au Hardcore
Join Date: Jun 2005
Posts: 588
|
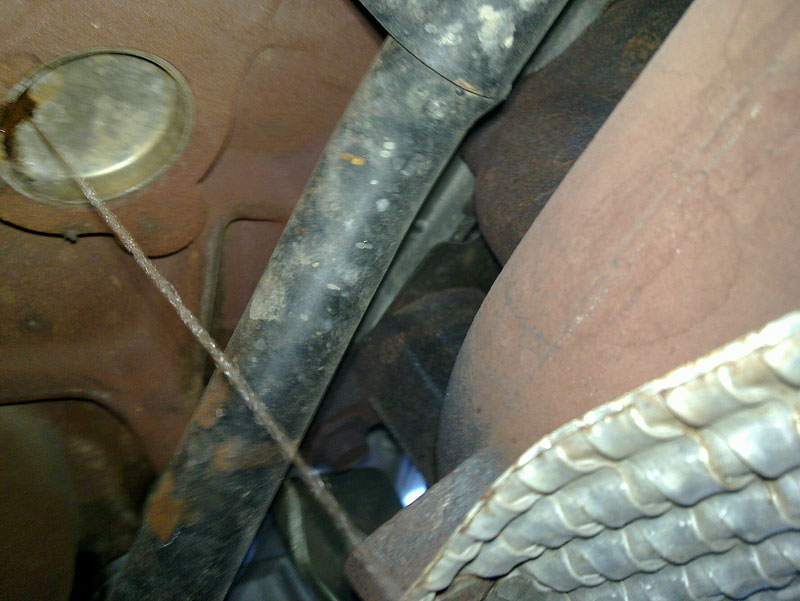
Once I started the engine the drip turned into a squirt. Definitely coolant. I managed to put the camera at the right angle and can see this...
 Seems to be nothing to do with the pipe. Is that a welsh plug? The car has had a slow leak for some time, slow enough that you don't see any drips but does need to be topped up every couple of months. Looks like whatever that is has rusted through. Has to happen on a friday evening. 
|
||
|
|

|
|
|
#4 | |||
|
AU DIE HARD
  Join Date: Nov 2005
Location: Between 2nd and 5th gear
Posts: 5,073
|
Thats what it is
 easy job if you can get all the plumbing and bits out of the road easy job if you can get all the plumbing and bits out of the road 
__________________
........Age and treachery will ALWAYS overcome youth and skill....... CORTINA 250 2V POWER soon to be AUXR8 Windsor pwrd .............WINDSOR WARLORD WHO CARRIES THE CLEVO MAFIA AND BROKEN BOSSES... .........................  ......................... .........................Quote:
|
|||
|
|

|
|
|
#5 | ||
|
FF.Com.Au Hardcore
Join Date: Jun 2005
Posts: 588
|
Bummer... I've been topping up with demineralised water because of the leak, so no additives. I wonder if that has contributed to the corrosion? If so I might need to be replacing more in the future.
 I started undoing the heat shield but then realised the bolts also fasten the exhaust manifold, so I stopped there. When you remove the manifold is there a gasket? Should that be replaced? Should I get the plugs from Ford or is there a better aftermarket version? I'll leave the car up on the ramps tonight then have a better look tomorrow, might be able to manage without taking the manifold off.  Here's two pages I've found so far that explain the process... http://www.go.jeep-xj.info/HowtoWelshPlugs1.htm http://autofix.com.au/blog/how-to-replace-welch-plugs |
||
|
|

|
|
|
#6 | |||
|
AU DIE HARD
  Join Date: Nov 2005
Location: Between 2nd and 5th gear
Posts: 5,073
|
The plugs are cheap enough from Autobarn ext. just measure the size first, I would go brass for the extra Couple of $$ (about $5 for the last 1 i brought) as for the manifold gasket it may come apart in 1 peice if your lucky and you can reuse it, just seal it with a coating of silastic or the like. Tap the plug in on one side all pull it out with a decent set of pliers or Vise grips, clean the hole with a bit of emery paper if needed . I usually give the plug a lite coating of sealer before replacing it . Easyest way I have found is to use a socket of simular size and gently tap the newby back in .
P.S there is a reason they suggest using and replacing coolant annually 
__________________
........Age and treachery will ALWAYS overcome youth and skill....... CORTINA 250 2V POWER soon to be AUXR8 Windsor pwrd .............WINDSOR WARLORD WHO CARRIES THE CLEVO MAFIA AND BROKEN BOSSES... .........................  ......................... .........................Quote:
Last edited by Whoosha; 12-08-2011 at 06:19 PM. |
|||
|
|

|
|
|
#7 | ||
|
FF.Com.Au Hardcore
Join Date: Jun 2005
Posts: 588
|
Yeah, will give the cooling system a good flush while I'm at it, that's something I've been meaning to learn how to do.
 Then in goes the proper coolant mix. Luckily Bayford spares is near me and they're open tomorrow morning. Then in goes the proper coolant mix. Luckily Bayford spares is near me and they're open tomorrow morning.
|
||
|
|

|
|
|
#8 | ||
|
FF.Com.Au Hardcore
Join Date: Dec 2004
Location: Newcastle NSW
Posts: 7,890
|
Auto shop will prob be cheaper and unlikley Ford will have brass ones which I would use iff keeping the car for a while. If not just get the steel ones
__________________
T3 TL50 #147 Silhouette Auto ESS - Brembos - Last of 3 in T3 spec, only AUIII TL50 ever built -14.2 sec @ 98mph bog stock. Only customer ordered T3 TL50 built, only LWB sedan plated AUIII and the last performance enhanced LWB sedan built by Ford Aust. AUII Fairlane Ghia Sportsman 5.0L in Blue Pearl OWN THE ROAD |
||
|
|

|
|
|
#9 | ||
|
FF.Com.Au Hardcore
Join Date: Jun 2005
Posts: 588
|
I am going to supercheap now: getting brass plugs, gasket sealer, a manifold gasket if they have it, bolts if they have them, maybe change the O2 sensor while I'm at it. I was going to Bayford spares in order to get the correct coolant as I presume you can only get that from Ford?
Might even just fill it with demin water to start with, then flush it again in a few days and add the proper coolant. Two flushes with some driving between should help clean it a bit better. Also saw a tip to hose out the welch plug opening while it was out to get rid of the crap in there. I'm going to try to replace all 5 if I can. |
||
|
|

|
|
|
#10 | ||
|
FF.Com.Au Hardcore
Join Date: Dec 2004
Location: Newcastle NSW
Posts: 7,890
|
Be aware there is a welsh plug in the back of the block. Gearbox out & flywheel off to get at this one
__________________
T3 TL50 #147 Silhouette Auto ESS - Brembos - Last of 3 in T3 spec, only AUIII TL50 ever built -14.2 sec @ 98mph bog stock. Only customer ordered T3 TL50 built, only LWB sedan plated AUIII and the last performance enhanced LWB sedan built by Ford Aust. AUII Fairlane Ghia Sportsman 5.0L in Blue Pearl OWN THE ROAD |
||
|
|

|
|
|
#11 | |||
|
FF.Com.Au Hardcore
Join Date: Jun 2005
Posts: 588
|
Quote:
From under the car I can see the front two welch plugs, and the second one actually looks in pretty good nick. Maybe it's just because it hasn't corroded through yet so the outside still looks clean. I reckon I can do the front one without needing to remove the manifold, but if I have enough time I'm going to do the whole 5 on the side. That's if I can figure out how to drain my rad, I have the plug off but right now it's just dripping, will take a while to drain 16L.  http://www.fordforums.com.au/showpos...22&postcount=8 Nothing ever goes smoothly for me, simple jobs always take twice as long or get postponed because of some problem... http://www.fordforums.com.au/showpos...22&postcount=8 Nothing ever goes smoothly for me, simple jobs always take twice as long or get postponed because of some problem...
|
|||
|
|

|
|
|
#12 | ||
|
FF.Com.Au Hardcore
Join Date: Jun 2005
Posts: 588
|
Can't seem to get the plug out (or rather push it in)
Banging away as hard as I can, both a small bit on the side and a 40mm driver "head on" Doesn't seem to be moving. Par for the course... |
||
|
|

|
|
|
#13 | ||
|
FF.Com.Au Hardcore
Join Date: Feb 2005
Location: Melb north
Posts: 12,025
|
i usually push the old walsh plugs into the block, concentrating on one corner then rip them out with multi grips or vice grips.
|
||
|
|

|
|
|
#14 | |||
|
FF.Com.Au Hardcore
Join Date: Jun 2005
Posts: 588
|
Quote:
I knocked two holes into it and tried to pull it out with pliers, but that's not working either. Been trying for over an hour now, just to get this one plug out... Would it be easier or more difficult with the engine warm? It's stone cold right now. |
|||
|
|

|
|
|
#15 | ||
|
FF.Com.Au Hardcore
Join Date: Jun 2005
Posts: 588
|
Would a penetrating lubricant help, something like WD40? (Which of course, I don't have, and can't get since my car is undriveable. Yeah, one of those days.
 ) )
|
||
|
|

|
|
|
#16 | ||
|
FF.Com.Au Hardcore
Join Date: Jun 2005
Posts: 588
|
I think my topping up with demineralised water over the past year or so has caused it rust in, and through. That'll learn me. Wife gets back soon so I'm off to supercheap again. Going to replace the thermostat and housing gasket while I'm at it because it's filthy. I did a decent flush (garden hose in the upper inlet of the radiator, then reverse with hose in the bottom outlet, then the surge tank, then hose in the thermostat housing with thermo removed and engine running) and there's a lot of crap coming out, is that normal? Kind of like mud. I presume it's bits of rust.
|
||
|
|

|
|
|
#17 | ||
|
FF.Com.Au Hardcore
Join Date: Jul 2010
Posts: 868
|
do not put grooves in the block while changing welch plugs
|
||
|
|

|
|
|
#18 | |||
|
FF.Com.Au Hardcore
Join Date: Jun 2005
Posts: 588
|
Quote:
|
|||
|
|

|
|
|
#19 | ||
|
FF.Com.Au Hardcore
Join Date: Jun 2005
Posts: 588
|
Still trying today unsuccessfully to remove the plug. I've spent several hours on this. I'm pretty close to getting the car towed to someone else.
|
||
|
|

|
|
|
#20 | ||
|
FF.Com.Au Hardcore
Join Date: Feb 2005
Location: Melb north
Posts: 12,025
|
do you have vice grips or multi grips , you should be able to muscle it out, sometimes you can use a screw driver or even two to pry them out,or you might be able to push it in further then reposition it with a with a bent welding rod or coat hanger so you can get a better shot at it, don`t take this as a critisism, but it sounds like your a little anxious about being a bit brutal to get it out, sometimes you have to be.
|
||
|
|

|
|
|
#21 | |||
|
FF.Com.Au Hardcore
Join Date: Jun 2005
Posts: 588
|
Quote:
I took a photo just as I was giving up then realised the plug had actually moved a bit (couldn't see it until I took the pic), so that spurred me on to try some new methods. I'm getting there. http://www.fadingvictoria.com/p/stuckplug2.jpg Run out of daylight but I'll be back at it tomorrow with renewed vigour. 
|
|||
|
|

|
|
|
#22 | ||
|
FF.Com.Au Hardcore
Join Date: Aug 2005
Location: Fremantle W.A
Posts: 661
|
Yes you're getting there. Going by the photo's in last post looks like your using a tool that is too small
on the welsh plug because it looks like you've hit it in 4 different spots on the plug if you know what I mean  . Try using somthing that as close to the diametre of the plug as possible but . Try using somthing that as close to the diametre of the plug as possible but is not going to touch the engine block. The next few should be easier once you've sussed out a good method provided access is'nt an issue. You'll get there mate.
__________________
Losing my patients with unfinished threads  Did the ideas people helped you with work or not! 
|
||
|
|

|
|
|
#23 | ||||
|
FF.Com.Au Hardcore
Join Date: Jun 2005
Posts: 588
|
Quote:
Quote:
I am going to try some more pulling and twisting to see if I can get the plug OUT, otherwise I'll go with your suggestion and just push it into the block, then use vice grips to get it out... I can't get the exhaust manifold off because the extension bar (or direct ratchet) fouls on the exhaust pipe tube. I can get the driver on the bolt no worries, but I can't actually attach anything to turn it. I don't think I'm going to be able to do the other plugs without removing that manifold. Has anyone else here done it? How? |
||||
|
|

|
|
|
#24 | ||
|
FF.Com.Au Hardcore
Join Date: Jun 2005
Posts: 588
|
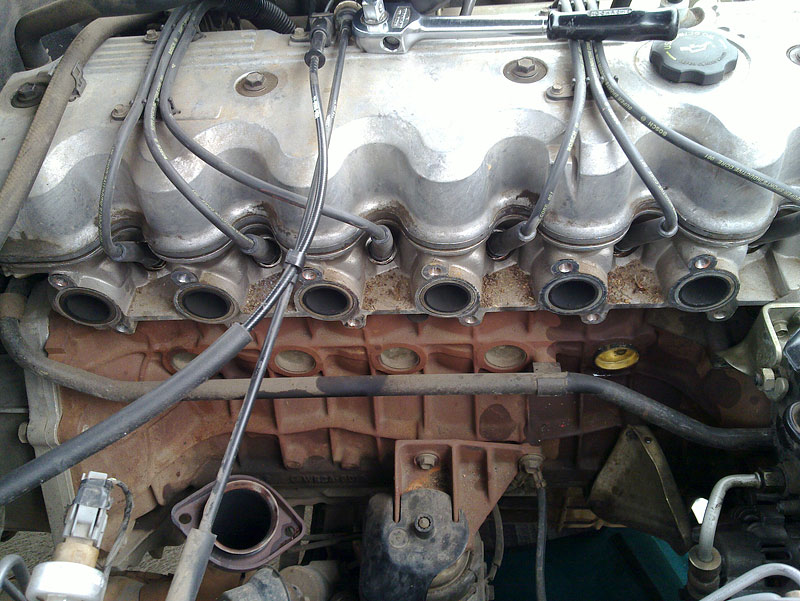
I found a size 14 socket wrench (I think?) and was able to get to the difficult nut to remove the exhaust manifold. I don't have a replacement gasket but the existing one came off cleanly. Next problem...
 That heater pipe is conveniently placed right over EVERY plug, meaning I can't tap in the new plug square... unscrewing the bracket between the front two plugs does nearly nothing since it's a rigid pipe. Is there some way to disconnect the pipe without having to remove the water pump? (If it gets to that point, with having to redo the belt, water pump pulley and gaskets etc, I think I'm going to call it a day.) EDIT: now that I've looked at the others I can actually get a driver and extension bar in square - it's only the first one that the pipe fouls on, because it tilts downwards slightly. I've removed and discarded the half-in first plug and I'm going to try redoing it with a bit of wood to keep it square. The others should be far easier. It's ironic that the bend in the heater pipe allowed me to get out the first one without removing the manifold, but now it's making it difficult to get the new one in. Last edited by rowan194; 15-08-2011 at 12:45 PM. |
||
|
|

|
|
|
#25 | ||
|
FF.Com.Au Hardcore
Join Date: Jun 2005
Posts: 588
|
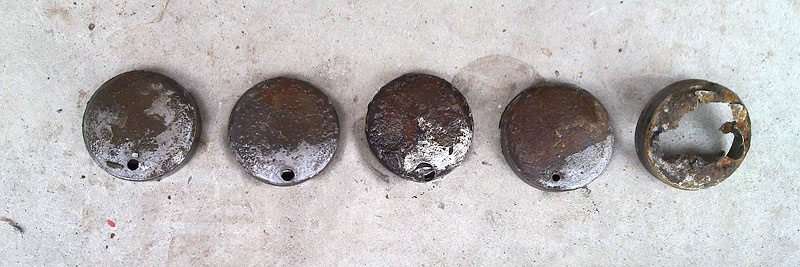
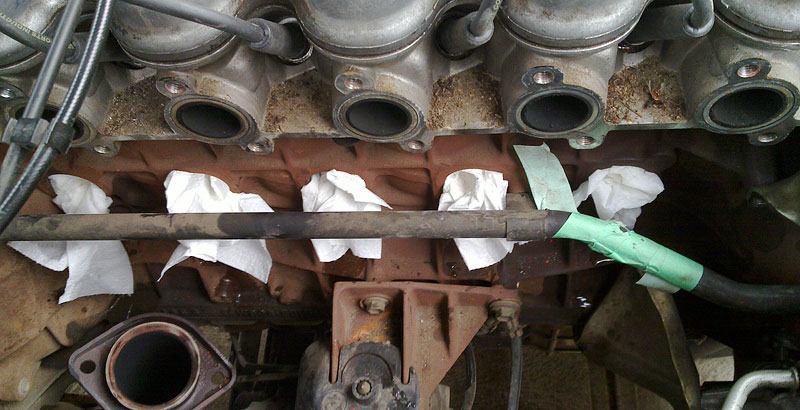
I've now removed all of the plugs on that side.
 Numbers 2-5 were a breeze compared with the first one.  I've stuffed some paper towel into the openings to help wick out the water (they soak through and the end outside will drip) to try to keep the rim a bit drier for when I gasket the new plug in.  Hope this series of events inspires people to keep going, there's been a few points in this job I've been about to give up, but I've taken a step back and rethought things, found a way around it... |
||
|
|

|
|
|
#26 | ||
|
FF.Com.Au Hardcore
Join Date: Feb 2005
Location: Melb north
Posts: 12,025
|
well done mate.
|
||
|
|

|
|
|
#27 | ||
|
FF.Com.Au Hardcore
Join Date: Aug 2005
Location: Fremantle W.A
Posts: 661
|
You beauty! good on you Rowan, thats what you gotta do, take a step back be calm and think straight, you've done well.
Glad to see you have made major progress and well documented with the pics.
__________________
Losing my patients with unfinished threads  Did the ideas people helped you with work or not! 
|
||
|
|

|
|
|
#28 | ||
|
Starter Motor
Join Date: May 2008
Location: RACETRACK
Posts: 11
|
well done mate, just goes to show persistance pays off

|
||
|
|

|
|
|
#29 | ||
|
FF.Com.Au Hardcore
Join Date: Jun 2005
Posts: 588
|
Yesterday, I had a lot of problems with the first plug because the extension bar was fouling on the heater pipe, so it wasn't going in square. There's also more plumbing around that area which made it difficult to move the hammer back to get a good whack. I tried a couple of plugs in that hole (discarded them each time, don't want to risk reusing one that's been tapped in) then left that and went to the second one, which went in perfectly. Niiiiccceeee. Had to leave it at that.
Today I decided to do the other plugs then come back to the first, and then realised that the second plug was probably a fluke - the other plugs weren't going in quite square either. With a bit of back and forth work I managed to get #3-#5 in, which gave me more confidence to try #1 again. Still more difficult because of the pipe, but I managed to get it in almost perfectly square by applying lateral upward force to the bar (to shift the heater pipe up slightly) at the same time I was whacking the plug in. Filled with tap water for now (just FOR NOW) and almost facepalmed and swore when I heard water dribbling onto the driveway, but I realised it was just some spillage from the filler running down the body.  Started the engine briefly to get the water circulating around, but it sounds like a neglected 30 year old corolla without the exhaust attached, so I decided to nix that idea and pop the exhaust manifold back on first.  So yeah, as long as I can get the manifold back on without any probs (bought a new gasket yesterday) it looks like the job is done. Just need to do a few cautious laps, then take it for a really good run on the freeway, then do a flush in a day or two and fill it with proper coolant... Once I've recovered from this I might start thinking about how to do the plugs on the other side. 
|
||
|
|

|
|
|
#30 | |||
|
FF.Com.Au Hardcore
Join Date: Jun 2005
Posts: 588
|
Quote:
 edit: step back, relax, think, retry... got it.  As far as the missing bolt, Bayford spares sell them... for $6 each! May as well just get a full set... Last edited by rowan194; 16-08-2011 at 02:07 PM. |
|||
|
|

|