
|
|

|
|
|
 26-01-2008, 04:46 PM
|
#1 | ||
|
FTF Club Moderator

Join Date: Jan 2005
Location: Driving my Tickford T3 Wagon in Sydney
Posts: 3,132
|
This is a post to warn people about rust on their AU's. We know that cars made of steel will rust. Most of us want to preserve our cars for a long time so its important to do the little things to make our cars last. Unfortunately our cars are not brand new covered by a paint and corrosion warranty any more.
On Thursday I decided to detail the car and inside the doors. I thought I should take the rubbers off the car as it would make the job a lot easier. In doing so I found some nasty rust. Under the rubber that goes from the bottom of the rear door up along the roof line down to the bonnet there is a join of two pieces of sheet metal that has been spot welded. Where the two pieces of metal meet there is no paint between them and being having moisture under the rubber trapped has caused the rust. Here is some photos of the rust I found. 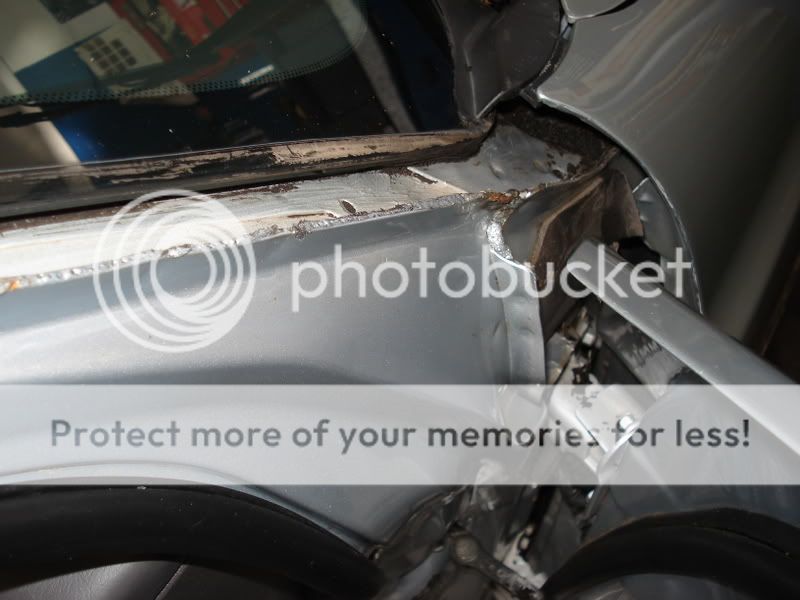 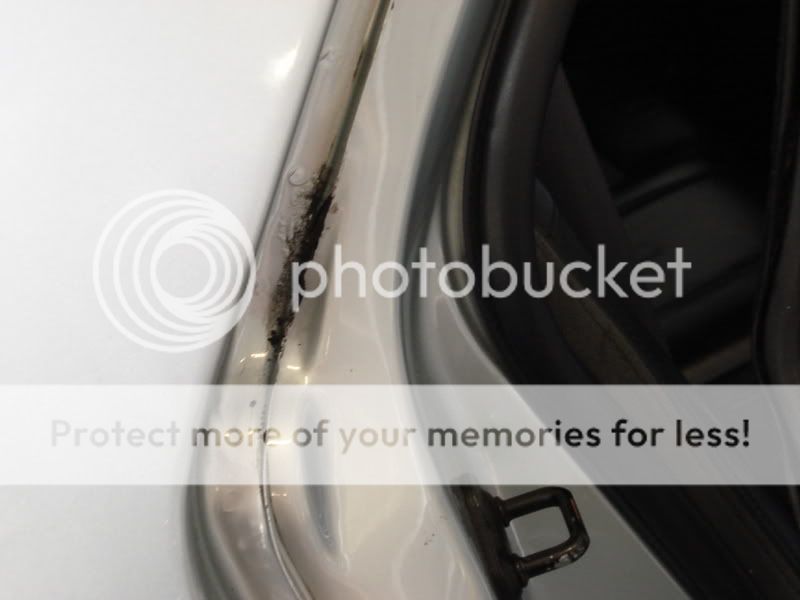  I have written a how to on taking the door surround rubbers, door rubbers and the windscreen cowling off. First we are going to take the door rubbers off. Weather it be a wagon, ute or sedan the method is still the same. I did this on the 4 post hoist at work as it makes it easier when working a chest height. How to remove the door rubber. 1. Open door. 2. This is the rubber we are going to remove. 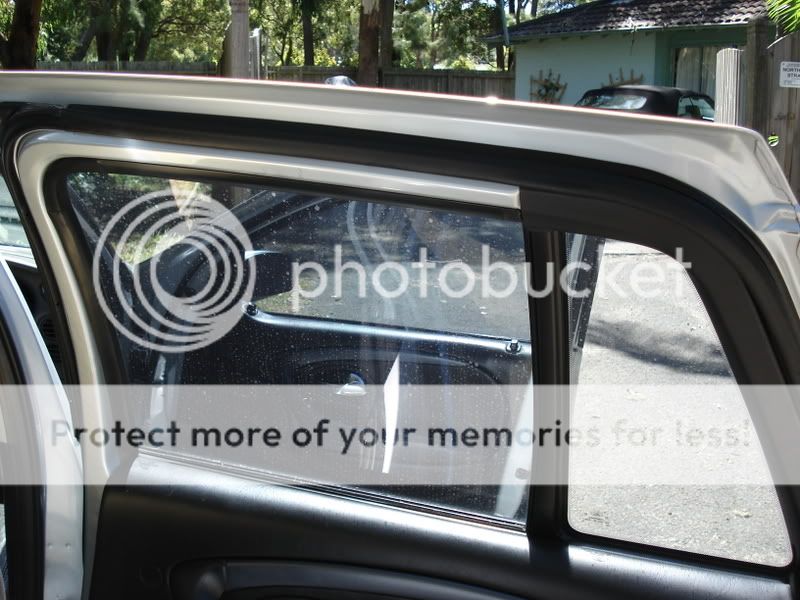 3. To remove the rubber from the top it lifts strait off. It is held on securely but it just squeezes on and off. 4. To remove the bottom half of the rubber, there are clips in the door in the shape of a T. The rubber on the back side has tiny holes in it spaced between 5 to 10cm. The rubber holes are placed on the T. Grab the rubber and pull in one direction along the rubber, then while stretched, pull away from the door. This will stretch the hole and remove it from one end of the T. The other end just slips right off then. Do this repeatedly to remove the rubber Here you can see all the T clips. You can see there is a few of them, only on the bottom of the doors. 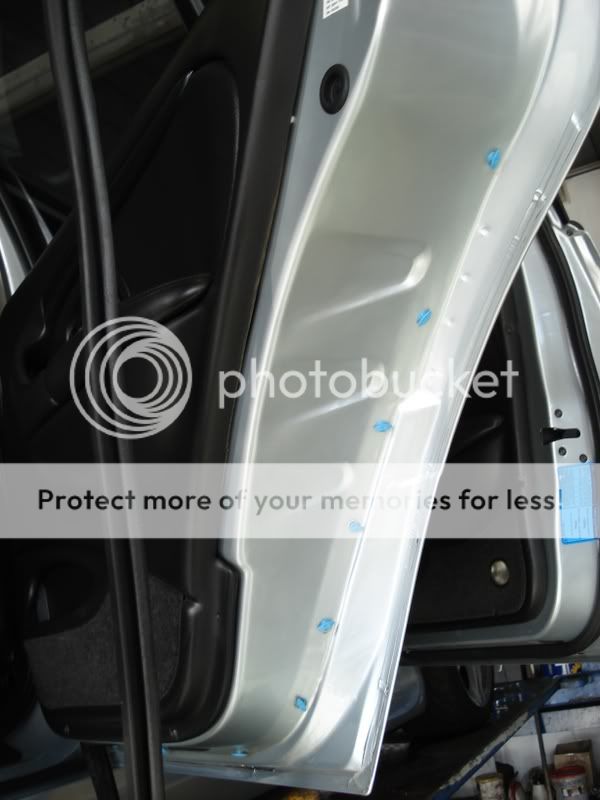 This is the T holding the rubber on.  5. With the rubber off clean any dirt and moisture away. 6. I would recommend adding a coat of wax under the rubber, to help prevent water penetration. 7. To install the rubber, put a hole over the T and pull the rubber to stretch the rubber, so the hole increase in size and place over the other side of the T. 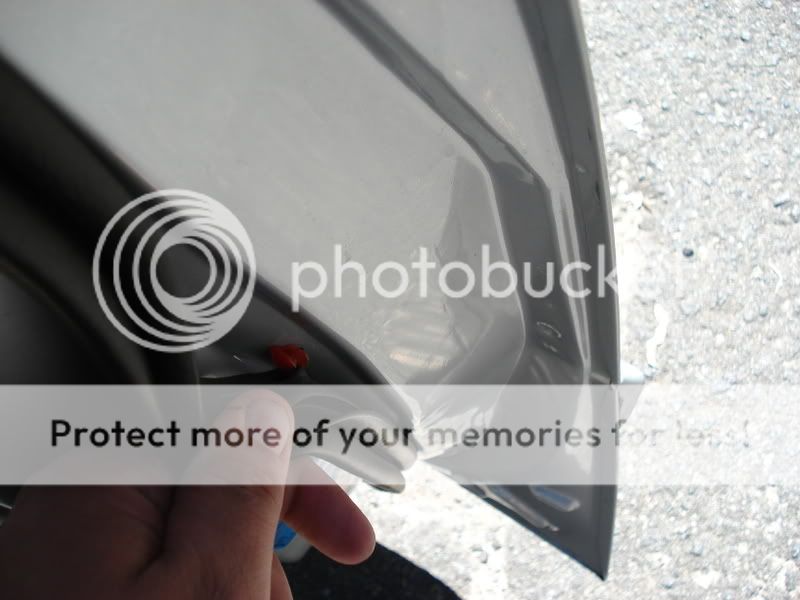 8. Top half slides right back on. 9. Check to see if it is sealed properly by going for a drive and listening for noise. How to remove the door surround rubber. Next is the long rubber. This rubber has no clips like the doors do. The rubber slides over the two pieces of sheet metal. 1. The best way to tackle this long rubber is start from one end and work your way to the other end. Easiest place to start is the rear door. This will be different for our 2 door friends but the principal is still the same. 2. There is a part of the long rubber at the top of the rear door that is held on by a channel in the door surround and the rubber sitting in this channel. 3. Slowly take the rubber off. The best way I found was to only take half the rubber off. Clean away any dirt and moisture. Wax the area. Reinstall the rubber, then do the front half. It just made it easier to handle and reinstall the rubber. 4. Reinstalling the rubber is easy. It just slides back into place. The front at the a pillar is a little challenging but is falls back into place. Under this rubber is where I found my rust. 5. If there is no rust, just clean and wax and away you go. If there is, its best remove it. What action to take will depend on the severity of the rust. How to remove the windscreen cowling. 1. To remove the cowling the wipers need to come off. At the base of the wiper are is a plastic cover. There is a little notch there to help lift the cover off. 2. There is a single 12mm nut and washer. Before you undo it. Mark on the windscreen with some tape where the wiper sits when the wipers are turned off. Reason being is that the bolt that holds the wiper on is a splined bolt. 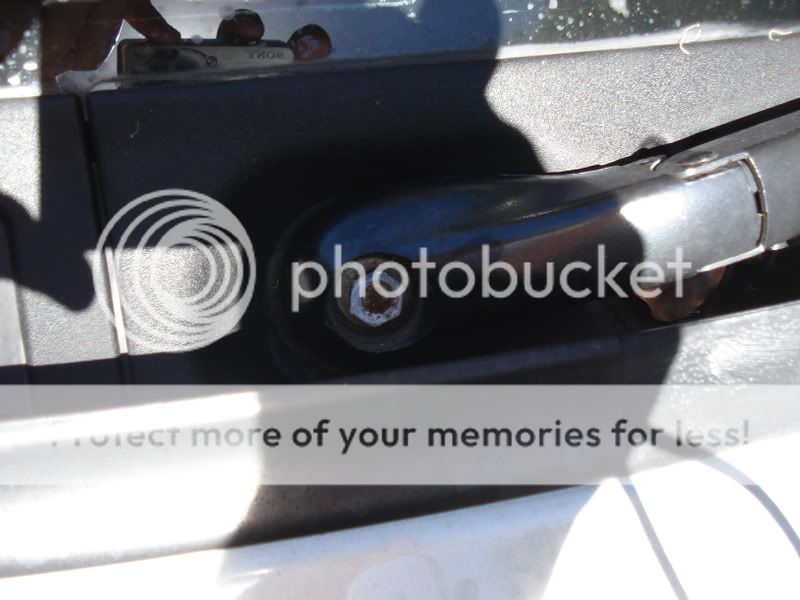 3. Open the bonnet. 4. Remove the rubber that sits on top of the firewall. Like the other rubbers it slides right off. The rubber is does have a left and right side as it is not symmetrical. 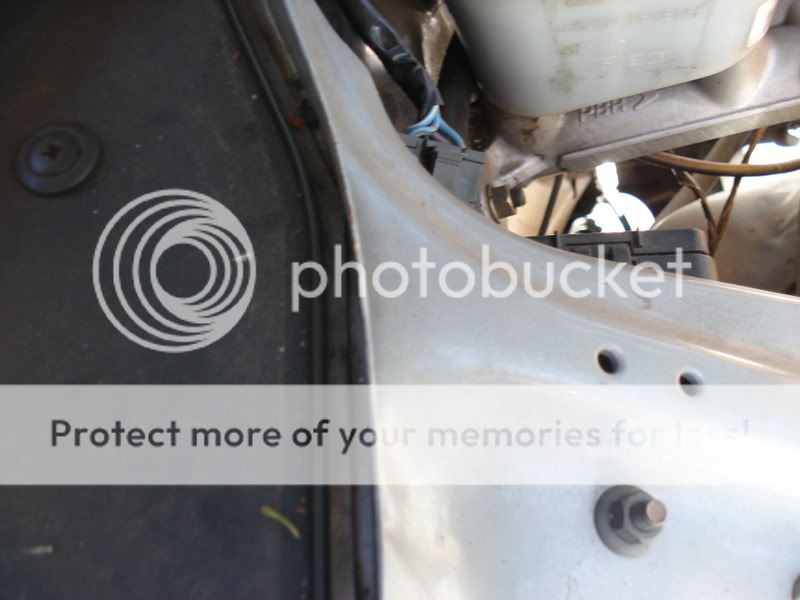 5. Next is to remove the trim plugs holding the cowling down. Just work through them. Being that they probably never been undone, they should come out with out needing to wrestle with them. 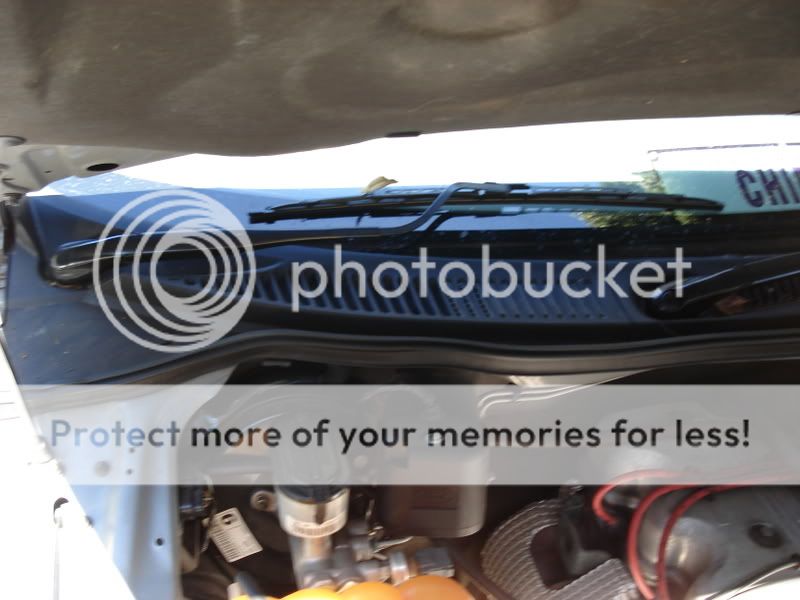 6. All that needs to happen is lift the cowling up and take it out. It may need to be wrestled with, just due its design it wants to snag itself on the bonnet. 7. Clean all the leaves, dirt and moisture. 8. Add a coat of wax for good measure. 9. Now that it is clean, time to put it back together. First place the cowling in its position. Then install the trim plugs and firewall rubber. 10. Close the bonnet. Time to do the wipers. Align the wipers with the markings you made. Then slide the base over the splined bolt. Check to see if it is aligned. Tighten the nut tight (I do not have the correct torque setting), don't forget the washer. Click the plastic covers in place. 11. Remove the tape from the windscreen and test wipers. The other rubbers are attached in the same principal. Be it just sliding on or off, with little T clips or sitting in a channel. I would recommend doing the other rubbers as well.
__________________
Albert Einstein: Es ist schwieriger, eine vorgefaßte Meinung zu zertrümmern als ein Atom. (It is more difficult to alter a preconception than split an atom) Falcon Tickford FPV (FTF) Car Club of NSW Fords in the Park 2010 I use and recommend Stingray Car Security. http://www.stingraycar.com.au/ |
||

|

|
| This user likes this post: |
|
26-01-2008, 05:19 PM
|
#2 | ||
|
FF.Com.Au Hardcore

Join Date: Sep 2007
Posts: 717
|
Nice right up. I have noticed little spots of rust here and there and this guide sums it up nicely. You might like to add under the scuff plates. I've found moisture under them after rain as well as small rust spots.
Excellent work! |
||
|
|
|
|
26-01-2008, 05:22 PM
|
#3 | ||
|
FTF Club Moderator
Join Date: Jan 2005
Location: Driving my Tickford T3 Wagon in Sydney
Posts: 3,132
|
Working on the scuff plates. The only rubber I didn't take off. I know there is moisture there, especially with the skirts.
__________________
Albert Einstein: Es ist schwieriger, eine vorgefaßte Meinung zu zertrümmern als ein Atom. (It is more difficult to alter a preconception than split an atom) Falcon Tickford FPV (FTF) Car Club of NSW Fords in the Park 2010 I use and recommend Stingray Car Security. http://www.stingraycar.com.au/ |
||
|
|
|
|
26-01-2008, 06:41 PM
|
#4 | ||
|
Its Resonating!

Join Date: Jun 2006
Location: Sydney, NSW
Posts: 1,612
|
I did this, but mine wasnt as bad. You get a quite good feeling after cleaning all that gunk out...
|
||
|
|
|
|
26-01-2008, 07:54 PM
|
#5 | ||
|
Regular Member

Join Date: Aug 2007
Location: Parramatta, SYD
Posts: 378
|
my wiper wounldnt come off...
__________________
Many Thanks 2001 AUII Factory LPG Manual XL Styleside Box High series bonnet Clear Side Indicator K&N Air Filter BAXR6T Snorkle Low Fronts, Super Low Leafs |
||
|
|
|
|
26-01-2008, 08:04 PM
|
#6 | |||
|
Its Resonating!
Join Date: Jun 2006
Location: Sydney, NSW
Posts: 1,612
|
Quote:
|
|||
|
|
|
|
26-01-2008, 08:19 PM
|
#7 | ||
|
Regular Member
Join Date: Aug 2007
Location: Parramatta, SYD
Posts: 378
|
got the nut out but it just wouldnt let go and i was pulling so hard even my car was moving...
__________________
Many Thanks 2001 AUII Factory LPG Manual XL Styleside Box High series bonnet Clear Side Indicator K&N Air Filter BAXR6T Snorkle Low Fronts, Super Low Leafs |
||
|
|
|
|
27-01-2008, 01:32 AM
|
#8 | ||
|
FF.Com.Au Hardcore

Join Date: Feb 2005
Location: Narangba QLD
Posts: 4,338
|
ok with that write up..
whats the BEST product to use to remove all that buildup of gunk?? i dont want to be hosing in there LOL mine has a heap of gooy grimey dirt on the join of the outter and inner door skin on the BOTTOM of the door.. being such thick gunk i dont know what to hit it with so it doesnt scratch the hell out of my car (a scraper would be the easiest tool but the worst for possibly making more spots for rust to form via scratches) cheers
__________________
On The Street Feature Winner Performance Ford Mag See my car at:-www.aufalcon.com/blackers10 |
||
|
|
|
|
27-01-2008, 09:31 AM
|
#9 | ||
|
Its Resonating!
Join Date: Jun 2006
Location: Sydney, NSW
Posts: 1,612
|
Well I just wiped it down, then polished it up with some cut and polish wax.
|
||
|
|
|
|
27-01-2008, 11:08 AM
|
#10 | ||
|
Regular Member
Join Date: Aug 2007
Location: Parramatta, SYD
Posts: 378
|
i finally got the wipers off and i found the place where my car is leaking water into the car aswell. two birds with one stone!
__________________
Many Thanks 2001 AUII Factory LPG Manual XL Styleside Box High series bonnet Clear Side Indicator K&N Air Filter BAXR6T Snorkle Low Fronts, Super Low Leafs |
||
|
|
|
|
27-01-2008, 01:14 PM
|
#11 | |||
|
FTF Club Moderator
Join Date: Jan 2005
Location: Driving my Tickford T3 Wagon in Sydney
Posts: 3,132
|
Quote:
__________________
Albert Einstein: Es ist schwieriger, eine vorgefaßte Meinung zu zertrümmern als ein Atom. (It is more difficult to alter a preconception than split an atom) Falcon Tickford FPV (FTF) Car Club of NSW Fords in the Park 2010 I use and recommend Stingray Car Security. http://www.stingraycar.com.au/ |
|||
|
|
|
|
28-01-2008, 12:09 AM
|
#12 | ||
|
Regular Member

Join Date: Oct 2005
Location: Sydney
Posts: 288
|
Hi chief, i have a spot on my roof where the paint first started to crack, then it started to bubble up around the crack.
am i up for a respray?
__________________
Prev: 98 Au forte  : :Now: 05 Wrx 
|
||
|
|
|
|
28-01-2008, 02:10 AM
|
#13 | |||
|
FTF Club Moderator
Join Date: Jan 2005
Location: Driving my Tickford T3 Wagon in Sydney
Posts: 3,132
|
Quote:
__________________
Albert Einstein: Es ist schwieriger, eine vorgefaßte Meinung zu zertrümmern als ein Atom. (It is more difficult to alter a preconception than split an atom) Falcon Tickford FPV (FTF) Car Club of NSW Fords in the Park 2010 I use and recommend Stingray Car Security. http://www.stingraycar.com.au/ |
|||
|
|
|
|
18-02-2009, 11:59 AM
|
#14 | ||
|
FF.Com.Au Hardcore
Join Date: Feb 2005
Location: Narangba QLD
Posts: 4,338
|
oh bugger....
i found another piece of rust on my car AARRRGGHH!! its the rear right IRS mount plate the piece of steel thats welded to the body that the rear left corner of the IRS cradle bolts to... it is just falling apart with rust... not good
__________________
On The Street Feature Winner Performance Ford Mag See my car at:-www.aufalcon.com/blackers10 |
||
|
|
|
|
18-02-2009, 12:45 PM
|
#15 | ||
|
Living the dream
Join Date: Nov 2005
Location: NSW
Posts: 1,795
|
Between the bootlid and rear quarter panel, near the rear windscreen is another rust-prone area on sedans. Good idea to flush that regularly and coat with WD-40/wax/fish oil.
I'll check my other locations tonight. My AU seems to be fairly rust free, but it's a late 02 build, maybe the quality improved. I've seen some shockers though. |
||
|
|
|
|
18-02-2009, 01:08 PM
|
#16 | ||
|
FF.Com.Au Hardcore
![ten[A]cio[U]s's Avatar](image.php?u=10683&dateline=1382916548)
Join Date: Nov 2005
Location: Wagga Wagga
Posts: 2,507
|
Nice write up chief. I have been wanting to take these off for a while. I went for a drive on some very dusty roads and wanted to remove them to clean them. Looks like there will be two reasons to do this.
__________________
Daily: AU Forte Wagon Project: AU Fairmont - Wants to be turbo The Family Car: 2009 G6E Turbo Future fun: 1968 Ford Galaxie 500 |
||
|
|
|
|
18-02-2009, 01:19 PM
|
#17 | ||
|
FF.Com.Au Hardcore
Join Date: Feb 2005
Location: Narangba QLD
Posts: 4,338
|
found rust in debs car today.. in 1 of the seams under the rear right tail light assembly
__________________
On The Street Feature Winner Performance Ford Mag See my car at:-www.aufalcon.com/blackers10 |
||
|
|
|
|
18-02-2009, 02:09 PM
|
#18 | ||
|
Walking with God

Join Date: Mar 2005
Location: Melbourne
Posts: 7,321

|
Great write up Chief. Perhaps submit this to Russ to be included in the Technical Documents section.
Cheers, GK
__________________
2009 Mondeo Zetec TDCi - Moondust Silver 2015 Kia Sorento Platinum - Snow White Pearl 2001 Ducati Monster 900Sie - Red Now gone! 1999 AU1 Futura Wagon - Sparkling Burgundy On LPG Want a Full Life? John 10:10 |
||
|
|
|
|
19-02-2009, 02:45 AM
|
#19 | |||
|
Resident AFF detailer

Join Date: Dec 2008
Location: Melbourne, VIC
Posts: 3,730

|
Quote:
__________________
No longer an 'active' detailer. |
|||
|
|
|
|
19-02-2009, 06:29 PM
|
#20 | ||
|
FF.Com.Au Hardcore

Join Date: Jun 2006
Location: Perth
Posts: 566
|
Agreed, good write up..
Is there an easy way to clean out any leaves and gunk that may have gotten through the cowel and down into the lower inside part of the front guards? Cheers Randel
__________________
Daily Driver - FG GS Ute Toys - 351 XY Falcon and FG GT |
||
|
|
|
|
20-02-2009, 01:01 PM
|
#21 | ||
|
FF.Com.Au Hardcore
Join Date: Nov 2005
Location: Wagga Wagga
Posts: 2,507
|
How much would new seals be? My rear ones are stuffed..
New seals all road then clean the gunk out when there off
__________________
Daily: AU Forte Wagon Project: AU Fairmont - Wants to be turbo The Family Car: 2009 G6E Turbo Future fun: 1968 Ford Galaxie 500 |
||
|
|
|
|
20-02-2009, 01:03 PM
|
#22 | ||
|
FF.Com.Au Hardcore
Join Date: Nov 2005
Location: Wagga Wagga
Posts: 2,507
|
lol just noticed. Why no strocker!?
__________________
Daily: AU Forte Wagon Project: AU Fairmont - Wants to be turbo The Family Car: 2009 G6E Turbo Future fun: 1968 Ford Galaxie 500 |
||
|
|
|
|
21-02-2009, 10:56 AM
|
#23 | ||
|
FF.Com.Au Hardcore
Join Date: Feb 2007
Posts: 606
|
Top corners of the windscreen under the rubber door seal and behind the mirrors are bad for it to.
__________________
9/98 AU1 XR6hp-about to retire from the road and be reborn on the race track. 86 ZL mint grandpa spec with premo sound and 150000km 07 TTG XForce, PLAZMAMAN, IDYNO TUNED, 349KW@all 4! 97 el futura MOCKed up with a 2500 stall, heaps of fun! |
||
|
|
|
|
21-02-2009, 11:11 AM
|
#24 | |||
|
windsor user
Join Date: Dec 2004
Location: Geelong
Posts: 13,123
|
Quote:
|
|||
|
|
|
|
15-10-2016, 07:00 PM
|
#25 | |||
|
Guest
Join Date: Feb 2012
Location: Sydney
Posts: 653
|
Quote:
|
|||
|
|
|
|
15-10-2016, 07:22 PM
|
#26 | ||
|
RS The Faster Fords
 
Join Date: Feb 2014
Location: Westralia
Posts: 1,690
|
Bootlid spoilers seem to be a problem, either the mounting holes go or they leak into the cavity and rust the bottom of the bootlid out. When I removed mine the build up of grime was staggering. Cleaned then waxed and reassembled but it still bothers me...
Trying an electronic rust control module, I hear good things, they use them in commercial air con systems and steel structures aswell with good results...
__________________
Escort RS2000 Restored factory a/c and alloys. TD Cortina Unrestored 35 000km 6cyl manual. Mk1 GT Cortina Project. FG XR50 Daily. |
||
|
|
|
|
15-10-2016, 07:48 PM
|
#27 | ||
|
Guest
Join Date: Feb 2012
Location: Sydney
Posts: 653
|
Do you rub candle sticks over the area like you might on timber draw runners etc
|
||
|
|
|


 Linear Mode
